
Codex Micro Reasoning Dial: How the Rotary Encoder Controls AI Thinking Depth
The Codex Micro puts one of its most powerful controls at your fingertips — literally: a physical rotary encoder dial that adjusts how deeply the AI reasons before responding. Turn it left for fast, low-cost pattern matching; turn it right for deep, multi-step deliberation on your riskiest code changes. This guide explains what that dial does mechanically, how it maps to OpenAI’s reasoning_effort API parameter, and when to use each of the four reasoning levels to get results without wasting compute or time.
Unlike digging through menus or remembering keyboard shortcuts, the Codex macropad makes reasoning depth a tactile, in-the-moment decision — a single click of a detent, not a context switch.
What Is a Rotary Encoder? The Physics Behind the Dial
How a Rotary Encoder Works Mechanically
A rotary encoder is a position sensor that converts angular rotation into digital pulses. Inside, a disk with evenly-spaced contact zones connects to two output pins (A and B) with a 90° phase difference — called quadrature output. As you turn the physical dial, the A/B phase pattern tells the keyboard’s firmware whether you’re rotating clockwise or counterclockwise, and how far.
This architecture has a key advantage over a traditional potentiometer: there’s no fixed start or end position, and no resistive track to wear down. A rotary encoder is rated for tens of millions of cycles. The Codex Micro’s switches are each rated at 50 million keypresses — more than most developers will ever put through them. The encoder also emits a satisfying physical click at each detent position, giving you tactile confirmation of exactly which reasoning level you’ve landed on without looking away from your editor.
Why Keyboards Use Rotary Encoders
Rotary encoders are ideal for continuous-value controls like volume, scroll speed, and zoom. Now add AI reasoning depth to that list. A keyboard firmware — typically QMK-based — reads the encoder’s pulse count and translates rotation into commands. On the Codex Micro, those commands map directly to Codex’s reasoning_effort parameter. The Work Louder Input software handles layer configuration, letting you assign different encoder behaviors per application context, so the same dial can control volume in Spotify and reasoning depth in Codex without any manual switching.
The Reasoning Dial: What It Actually Controls
How reasoning_effort Works Inside Codex
When you turn the Codex Micro’s rotary encoder, you’re changing OpenAI Codex‘s reasoning_effort parameter — the same control available as a software slider in the desktop app or a CLI flag. Before producing any visible output, the model runs an internal reasoning pass: a private chain of thought that users never see directly. The effort level sets the token budget for that internal pass. A larger budget means more reasoning steps, more considered tradeoffs, and more rounds of self-correction before the model commits to an answer.
Crucially, reasoning effort is not the same as response verbosity. OpenAI treats reasoning.effort and text.verbosity as separate controls — you can dial up to High reasoning and still get a concise 5-bullet summary as your output. The extra budget goes into thinking, not typing.
The reasoning token budget scales roughly 3–5× from low to high effort. That scaling directly drives both latency and cost.
Low vs Medium vs High vs Extra High: What Actually Changes
Here’s what each reasoning level does and when it activates:
| Reasoning Level | Internal Steps | Typical Latency | Use Case |
|---|---|---|---|
| Low | Minimal — pattern match and respond | Sub-second to low single digits | Renames, typo fixes, import additions |
| Medium (default) | Moderate — task decomposition, one self-check | 5–20 seconds | Feature additions, small refactors, debug stacktraces |
| High | Extended — multiple deliberation rounds, edge cases surfaced | 30–90 seconds | Complex architecture, schema migrations, multi-module changes |
| Extra High (xhigh) | Maximum budget | 90+ seconds | Security audits, payment flows, irreversible changes |
The 30–90 second latency at High is not a bug — it’s the model spending tokens on internal deliberation that would otherwise surface as post-merge bugs.
Practical Reasoning Dial Guide: When to Turn It Up or Down
The Routing Rule: Use the Lowest Level That Can Reliably Complete the Job
The core principle here is to start low and escalate only when needed. Using High reasoning for a task that only needs Low is just waiting — a 90-minute cleanup session can stretch to 120 minutes at High effort with zero quality gain. The cost difference is real: a medium-effort session runs around $0.08, while the same session at High costs $0.25–$0.35 per comparable prompt set. The reasoning token budget scales 3–5× from low to high, and so does your bill.
“The reasoning effort control lets developers decide how much thinking the model does before answering — separate from how verbose or concise the response is.”
OpenAI Codex documentation
This distinction matters in practice. Medium is the default because it handles the majority of real coding tasks well. The dial exists so you can step outside that default quickly, without friction, when a task demands it.
Task-Type Routing Table
| Task | Dial Setting | Reasoning |
|---|---|---|
| Rename symbol, fix typo, add import | Low | Pure pattern matching; Low has the same quality as Medium, faster and cheaper |
| Feature addition, small refactor, debug stacktrace | Medium | Needs task decomposition and one round of self-checking |
| Complex architecture, module boundaries, schema migration | High | Multiple constraints, edge cases, option comparison required |
| Security audit, payment-flow refactor, irreversible changes | xhigh | Maximum deliberation before anything risky or unrecoverable |
The Escalation Ladder in Practice
The recommended workflow for a major refactor is Plan High → Build Medium → Polish Low. Use High to design a risky structural change and surface architectural edge cases; switch to Medium to implement the main change with task decomposition; then drop to Low for repetitive cleanup, copy polish, or docstring generation. Switching the physical dial between these phases — rather than navigating settings — makes this workflow natural and fast.
A related pattern for review-oriented work is Medium Build + High Review: write code at Medium effort, then dial up to High for a final diff review before merging. This catches the edge cases that Medium’s single self-check pass might miss, without paying High’s latency on every keystroke.
How to set up the escalation ladder on a new project:
- Open Work Louder Input and navigate to your Codex layer.
- Assign encoder clockwise to
reasoning_effort=highand counter-clockwise toreasoning_effort=low. - Verify the layer auto-switches when ChatGPT Codex comes into focus.
- Start a planning prompt at High — the model will deliberate before giving you an architecture recommendation.
- Once the plan is locked, click the dial counter-clockwise two detents to Medium.
- Implement the change; use the Agent Keys RGB feedback to monitor active threads.
- Drop to Low for any cleanup or repetitive formatting passes.
Agent Keys and the Reasoning Dial: Reading the Room
How Agent Keys Help You Choose the Right Reasoning Level
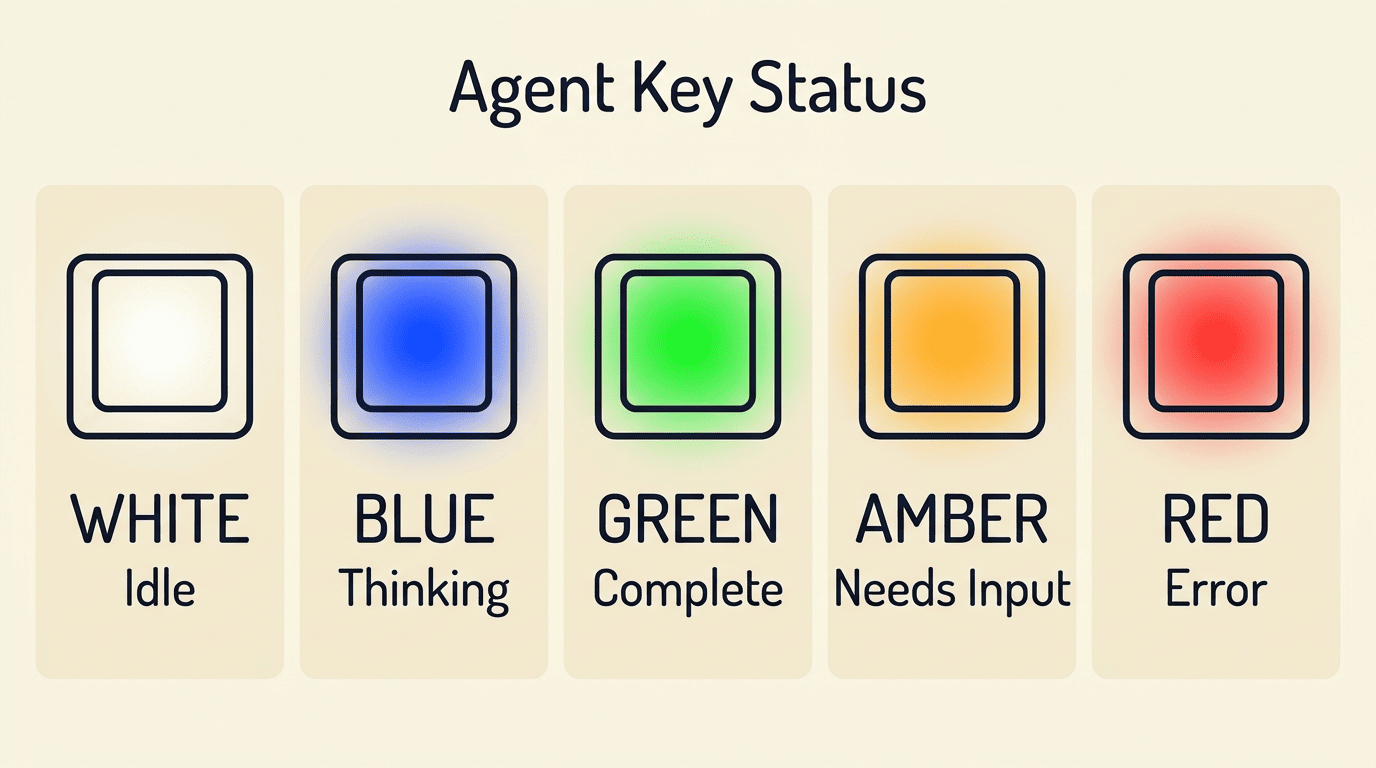
The six RGB-backlit Agent Keys at the top of the Codex Micro give you live state feedback for up to six parallel Codex agent threads. This ambient display feeds directly into your dial decisions: if you see blue (the agent is actively processing), adding more reasoning effort to a new task may only queue behind an already-burdened session. A red key — indicating an error — often signals that it’s time to dial up to High on the next prompt to investigate the root cause properly, rather than retrying at the same effort level that just failed. A green key (task complete, unread) means you can accept the output and move on at Low for the next task in the queue.
The full RGB color legend for Agent Keys:
- Blue — thinking/processing, agent is actively running
- Green — task complete, unread message waiting for review
- Orange/amber — input or approval needed from you
- White — idle, no active task
- Red — error, agent requires intervention
This RGB feedback loop turns the reasoning dial from a static setting into a dynamic decision: you’re reading agent state and adjusting effort level in response, rather than setting-and-forgetting at Medium. The Agent Keys guide covers the full interaction model — including double-press (within a 350 ms window) to accept or reject agent output — in more detail.
Configuring the Reasoning Dial in Work Louder Input
Software Setup: Mapping Reasoning Levels to Dial Positions
Work Louder Input — the configuration app for the Codex Micro — lets you define exactly what each dial detent does across up to 6 programmable layers. The device automatically switches its active layer when ChatGPT Codex comes into focus, so your dial behavior is context-aware without any manual intervention. You don’t need to remember which layer you’re on; the hardware handles it.
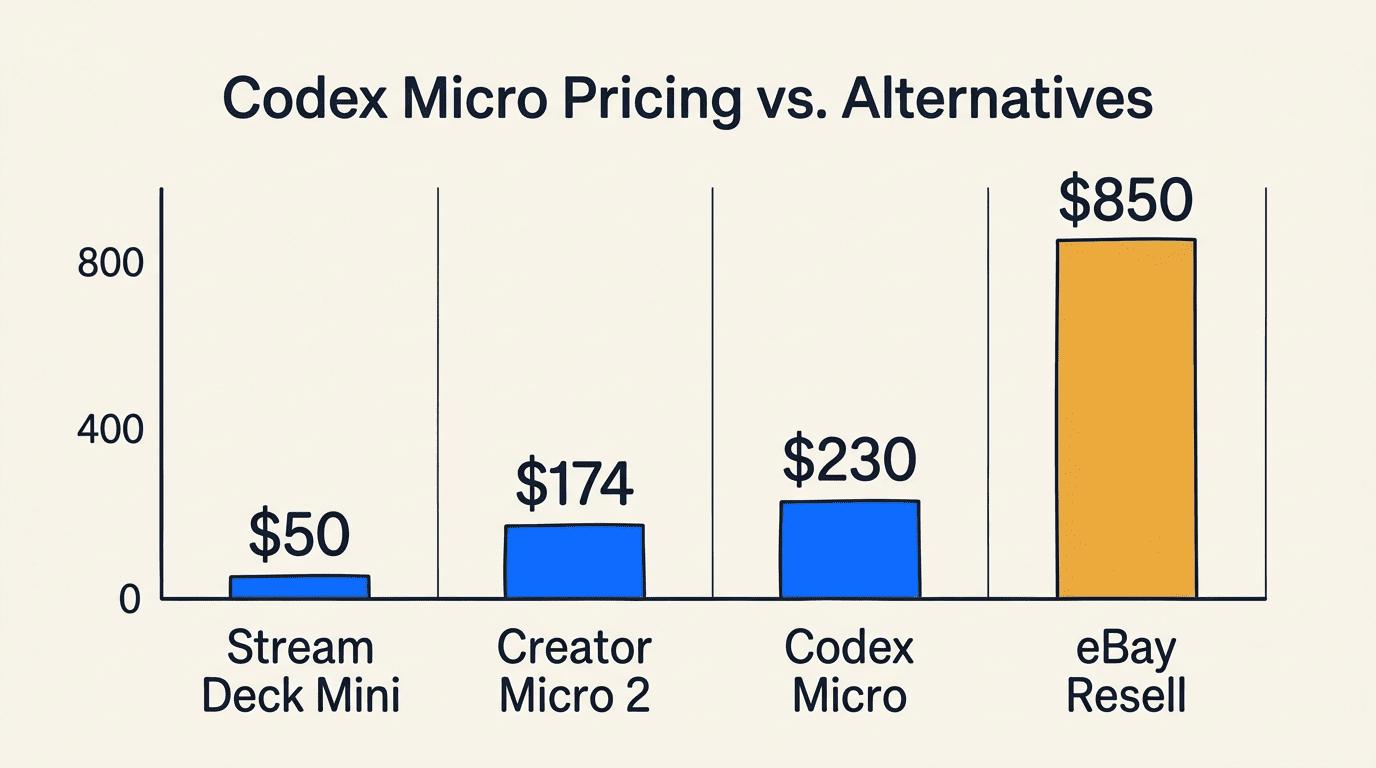
The Codex Micro is based on the Creator Micro 2 platform from Work Louder, which also supports the open-source VIA configurator — a QMK-based GUI for real-time key remapping without firmware reflashing. Advanced users can assign dial rotation to custom reasoning shortcuts, volume control in other apps, or project-specific macros. This flexibility is what separates the Codex Micro from generic macro keys: the software integration is first-party and Codex-state-aware, not just a generic HID input device.
For developers who want to go deeper than the default mapping, the Work Louder Input software exposes per-app layer logic and lets you chain dial events to multi-step macros — useful for workflows where a single reasoning-level change should also trigger a context window clear or a session log export.
Reasoning Dial vs Software Shortcuts: Why Hardware Wins Here
The Ergonomic Argument for a Physical Dial
Most Codex sessions stay at medium reasoning — not because medium is always right, but because changing it requires leaving the editor, finding the slider, and returning to context. Every context switch costs cognitive overhead. The Codex Micro’s rotary encoder solves this by making deliberation depth a zero-friction physical action: you feel the detent click, you know what level you’ve landed on, you keep coding.
This is the same ergonomic argument that pushed audio engineers from software DAW controls to hardware control surfaces decades ago. Reasoning depth is now a continuous, task-sensitive parameter that developers adjust multiple times per session — not a set-and-forget preference. The physical dial acknowledges that reality.
For comparison, Stream Deck-style macro triggering handles discrete workflow commands — the reasoning dial occupies a different niche: continuous-value tuning rather than one-shot macro triggering. Both approaches belong in a serious AI developer toolkit, but they solve different problems.
- Discrete macro triggering (Stream Deck-style): best for launching a specific agent task, pasting a prompt template, or toggling a tool.
- Continuous dial tuning (rotary encoder): best for parameters you adjust on a spectrum — reasoning depth, verbosity, temperature — where the value changes frequently based on task context.
- Joystick navigation (planar joystick): best for scrolling through diffs, navigating agent output lists, or panning large codebases.
- Agent Keys RGB (ambient feedback): best for monitoring parallel threads without leaving your current context.
Together these controls form a coherent physical interface for AI-assisted development — something no combination of keyboard shortcuts fully replicates.